Living in the moment. Living my life. Easy and breezy. With peace in my mind, Peace in my heart, Peace in my soul.
Wherever I'm going, I'm already home. Living in the moment.
It's time to switch the gears! This is China Glaze It's a Trap-eze! from the Cirque du Soliel: Worlds Away collection, which was released last December 2012. It's a glitter explosion! I'm telling you!
It has a milky jelly base packed with tons of chunky glitter in white, silver, green, cyan, orange, yellow, and magenta. It's a circus in a bottle! So festive! This polish reminded my husband of Easter eggs and pop tarts! :) I love it when he has an opinion! Hehe!
I tried to do some nail art with it and this is a heart made with my Sharpie fine point permanent marker, sealed with a top coat! Hehe! :) Again, think about how much fun it would be to design your nails with markers, just like Easter eggs! :D Makes me want to use this again for Easter, layered over a Skittles mani of various pastels! :)
It's a Trap-eze! is FUN, FUN, FUN! If you're feeling down and you need something to cheer you up, this is an instant pick-me-up! You can wear it alone or layer it on top of your favorite bright polish. It's probably not for everyone though.. you gotta love your glitter polish.
I love how the glitter is very dense, you don't need a lot of coats to build it up. You can leave it at 2 coats, but I went along with 3 for full coverage. I enjoyed slapping on those glitters so easily.
Here it is in one coat, so you can see its potential as a layering glitter top coat.
This is quite a sentimental entry because It's a Trap-eze! is my 50th bottle of polish from Polished Inthecity! :-O Gosh! How time flies, when you're having fun! :D
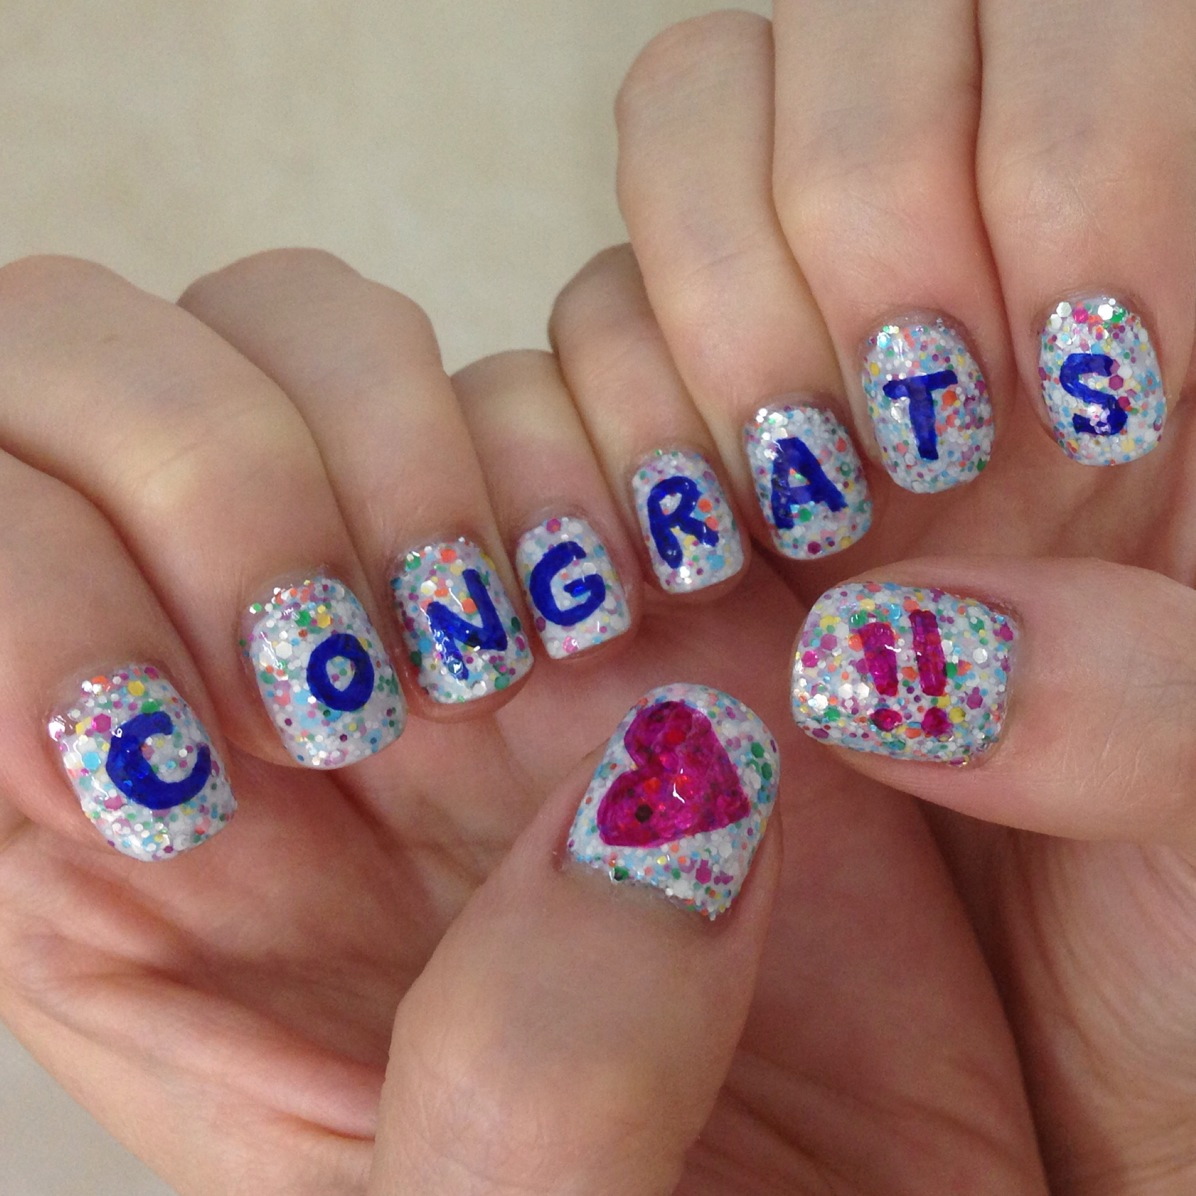
Polished Inthecity reached 1,500 followers in Instagram this week and this is my celebratory manicure for this significant milestone!
Polished Inthecity is the reason why I got started with blogging and has always been there to motivate me. This takes me back to my first ever blog post. Oh, the memories! Thank you, my dear friend! And CONGRATULATIONS!! :)
Hello! I probably sound like a broken record already, but I just need to get this out of my system. After 5 days of wearing the Zoya PixieDust Skittles mani, it was time to move on to my next adventure! :) 5 days is usually my maximum wear because by then, I start getting annoyed by my long nails and I end up breaking them if I don't cut or file them sooner! But before I took them off, I thought you'd like to see what they look like with a top coat on, and with shorter nails this time.
Zoya PixieDust with Top Coat
With a top coat on, I think the polish looks pretty normal. It kind of loses its character. Well, it's meant to be matte, right? But I still quite like it. It has a different look and finish, but the color still comes through. And you don't get the same depth and matte sparkle, but you can still see the glitters there! This would definitely cater to those who don't like the feel of textured polish. What do you think?
Zoya PixieDust in London, Fog Gray sparkle
Zoya PixieDust in Nyx, Perfect Periwinkle sparkle
Zoya PixieDust in Vespa, Mint Kiss sparkle
Zoya PixieDust in Godiva, Soft Nude sparkle
Zoya PixieDust in Dahlia, Black Beauty sparkle
These are 3 coats of the Zoya PixieDust nail polish featured here and here. After 5 days, I topped it off with 1 coat of Dazzle Dry top coat. The top coat didn't sink to the bottom as I expected. What a pleasant surprise! :) I'm not sure if it's because of the brand that I used. But it's my favorite quick drying top coat (more than Seche Vite :-O Don't hate me!! Lol! I'd love it if it doesn't have Toulene and doesn't cause shrinkage anymore! That's it. :) But I digress.)
To help you visualize this better, this is me last Monday morning. It was too early for me to be awake. :) I'm so not a morning person! :D
I think the only one that I preferred with a top coat on is Zoya Chyna. But it didn't really fit well with my Skittles mani, so I left it out. I didn't really give it a chance. I'm sorry! :( When there's a special occasion that calls for red nails, I'll definitely reach out for this and come up with a full matte sparkle manicure and I'll report back to you! (You might notice that the top coat is thicker on this one because I used the Sally Hansen Anti-chip Top Coat and it was already old and thick.)
Zoya PixieDust in Chyna, Red Dazzle sparkle
Last but not the least, I wanted to leave you with a photo in their original, ever divine, matte sparkle! *
Sigh! Just lovely! <3
...
In other news, I just received my package from Polish Please! for my two picks from the OPI Oz The Great And Powerful collection. I got What Wizardry is This? (another Liquid Sand) and Which is Witch? :D The collection will officially come out in March 2013. After I get to try What Wizardry is This?, I'll come up with an OPI Liquid Sand vs. Zoya PixieDust comparison, so stay tuned! :)
Those who are not fond of these OPI Liquid Sand and Zoya PixieDust formulas, don't fret! I'll be taking a break from these and switch it up a bit. I have a special feature that I'd like to do next! :D
In my last post, I showed you the 6 colors that were released as part of the Zoya PixieDust Special Textured Edition. And judging by how they are received so far, I think Zoya should make more of these!!
Hmm.. what colors do you think should they come up with next?? While I was editing photos for the blog, I stumbled upon this app that had filters which changed the color of the polish and it was a revelation! Just look at their potential!!!
The upper left is the original photo. The upper right looks like a chrome version. The lower right are fun hot summer shades. I'm liking the bright orange on the middle finger, the dandelion yellow on the right finger, and the creamy white on the pinky. And in the lower left, we haves shades of pink and purple. I love the rosy light pink on the pinky finger and the girly orchid on the ring finger. Who am I kidding?!? I love them all!
Here's another photo, with the nail polish bottle this time. I wish there's an option to modify the filters so that I can come up with more shades! Haha!
What do you think?? :) It's getting me reeeaaally excited that Zoya is talking about making some more! Here's a repost from a thread in Instragram (also in Facebook).
Are you with me?! We should start a riot! Haha!
Here's another Zoya Instragram post (also in Facebook) about making some custom shades of your own!
I have half a mind to get another bottle of Godiva to play around with!! I'm liking the rose gold on her ring fingers. :) Or I can just buy some empty bottles for polish and mix the colors that I have! It should be basic color theory right?
So, Godiva (gold) + Chyna (red) = shades of pink
Nyx (blue) + Chyna (red) = shades of purple
and well, Dahlia (black) + London (gray) could just make 50 shades of ... :D hehehe ;)
You know, I'll be honest. I wasn't a big fan of Zoya until this came along. And now, I'm looonging for more.
What colors would you like to see? I'm thinking Spring Pastels,
Summer Brights, Summer Neons, Romantic Neutrals... :D I
can go on and on. But to be specific (and in case I get my wish :D), I would love to see this in Tiffany blue (a blue counterpart of periwinkle Nyx, something like China Glaze For Audrey), mint green (a green counterpart of sage Vespa), sugar white (a neutral counterpart of gold Godiva), rose gold (like the ring finger where they mixed Godiva and Chyna), and a coral! :D Then for a neon collection, I'd love it in electric blue, neon yellow, neon orange, and neon pink! Haha!
I do hope that the Zoya fairies are listening!! :D Can we please have some more?? :D
** UPDATE 2/28/2013: NEWSFLASH! More Zoya PixieDust colors coming in this Summer 2013!!!
I'm soooo excited to share the Zoya PixieDust collection with you!!! As much as I loved my color block nail art, I had to remove them to give way for this. I couldn't resist! Look at that sugar-coated goodness! Boy, was I in PixieDust heaven! <3
It's my first time to buy an entire collection of nail polish. Usually, I just pick out my favorites and buy those. But this time around, I caved in. Every color just made sense. To me at least. This collection just has everything that I like! But then again, I probably like everything! Hehe! But seriously, I like my neutrals and Godiva covers that. I like my desaturated colors and I got those from Vespa, Nyx, and London. I like my edgy black (if you didn't know, I started wearing black nails in high school :) hehe) and I like my classic red! And everything looked good on my skin tone!! What more can a girl ask for??
I'm just so glad that I got hold of this whole collection!! This collection was released on the 1st of February. It's just the 3rd week of the month and I got it already! Woohoo! I ordered this from Monica over at Polish Please! and I think it's the last Godiva available in the Multiply site. I got them the day after I ordered. It was a long wait, but it made it to my doorstep! :D
Zoya recommends to use the polish on its own, without a base coat and a top coat. Just put on three thin coats and you're done! It's convenient to get a manicure just by bringing one bottle with you, especially when you're traveling. With that said, this is going to be my new travel companion! :) Here's a repost from the Zoya website:
Zoya PixieDust Nail Polish Collection
Infused with magic and wonder! The latest "must-have" nail polish finish - textured, matte and sparkling! This newly developed formula is sure to captivate with a magical sparkle and sugary finish like no other. The color experts at Zoya have created six, long-wearing stunners for the introduction of this enchanting look. IMPORTANT PixieDust Application Information - Do not use a base coat or top coat. Apply 1-3 (for full coverage) thin coats of polish. Allow product to dry down completely matte in between layers for full textured effect. The PixieDust textured formula may take up to 10 minutes to dry completely matte. Once dry, the textured finish is long lasting, matte and ultra-glittery!
So I followed the instructions above. The pictures below show the difference from coat to coat.
As expected, the dark shades Dahlia and Chyna (red) are the most pigmented. The least pigmented, in my opinion, is Nyx (periwinkle).
I might have done thicker coats on my left hand (upper half of the photo), which is why it came out darker than my right hand (lower half of the photo). Chyna hasn't dried up yet, so it looks semi-matte.
Everything looked perfect by the third coat! I couldn't help but use all of the colors at once and I ended up with a Skittle mani! :D I think the 5 colors (excluding the red Chyna) look good together! Is this something you would dare to wear? :)
I got a little conscious that they might chip off because they feel vulnerable without the protection of a top coat. Like, I worry that the polish might just melt off my fingernails after I wash my hands or take a shower. Haha! But I'm pleased to share that the wear is very good! My worries were put aside after seeing everything still intact after a few games of badminton and a good long shower.
This could possibly be my favorite collection of all time. It has the right mix of dainty, neutral, matte, glitter, glamour, edge, spunk, modern, you name it! The colors were all so easy to wear and so easy to apply! The polish didn't pool around the cuticles and I didn't have to do ANY cleanup after putting this on. Easy peasy!
If you're still reading, and you made it to this point (Thank you!), you'll realize that I can't stop writing about this! Hehe! And so, I have a couple more posts lined up. I'll be talking about custom shades (!!!), I'll be comparing this with OPI Liquid Sand, and maybe do some nail art with it! What else do you want to talk about? Are you as excited as I am?? :D
Stay tuned for more on this new trend! :) Hope you all have a good weekend!
You'll have to forgive me. I'm obsessed. And I just had to add... I got a chance to take pictures in the daytime today, in direct sunlight, and the colors are even more brilliant!! You can really see the texture. Nothing beats natural lighting. :) I think some mobile devices are not able to view the photo gallery above, so I'll just post the pictures below. I'm happy to report that it's day 4 and I'm still wearing this Skittles mani. :)
Godiva, Soft Nude sparkle, exclusive Zoya PixieDust Sparkle formula
Vespa, Mint Kiss sparkle, exclusive Zoya PixieDust Matte Sparkle formula
Nyx, Perfect Periwinkle sparkle, exclusive Zoya PixieDust Matte Sparkle formula
London, Fog Gray sparkle, exclusive Zoya PixieDust Matte Sparkle formula
Dahlia, Black Beauty sparkle, exclusive Zoya PixieDust Matte Sparkle formula
Chyna, Red Dazzle sparkle, exclusive Zoya PixieDust Matte Sparkle formula
I'm very excited to share with you my latest creation! I
feel so fashion forward! :D I cannot tell
you how distracted I am... There's something about this design that
makes my fingers look so long and slender. It's a cool illusion for
those who have shorter than the average fingers and nails, like me. :)
This
design is first inspired by @susieq1980 's tape mani. For the life of
me, I can't figure out how to use the tape properly, so I ended up
doing a freehand for my version.
It's also inspired by @martawarmuz 's #skittlette trend. Marta, from ChitChat Nails, defines this as a manicure consisting of two, or three, different
accent nails on each hand; as opposed to skittle nails, wherein each
nail should have a unique design. I love me some Marta's skittlettes!
:*) Here are my favorites!
I've
also been dying to use my new favorite blue, Essie's Butler Please
from the 2012 Winter collection. Isn't it sooo pretty? Just look at how bright that blue is! I don't
understand why there's so much hate around the formula or application.
It dries matte, fine, any topcoat can fix that. It's not streaky or uneven. It's a solid
two-coater and I'm glad that I took a chance on this. I love it!
I've
also seen so many new trends from the New York Fashion Week Fall 2013
runway shows, that I can't help but do something new and creative! :)
It helps to be surrounded by so many talented people with overflowing
creative juices! Hooray for Instagram! Some trends that I incorporated
into this look: milky white polish, dark shades, diagonal color
blocking, and gem accents, in place of a glitter gradient.
I
used the following polishes: Dazzle Dry base coat, Dazzle Dry top coat,
Essie Waltz (an elegant sheer white), Essie Butler Please (an
indulgent bright blue), and Orly Liquid Vinyl (black). Then I used
Swarovski crystals for the gem accents.
I
went through 4 iterations. Haha! From upper left, clockwise: 1) freehand mani, 2) with OPI Crown Me
Already glitter gradient, 3) with rhinestones and sponged tips, and 4)
with rhinestones only. Which one of the four do you like the
best? I knew I wanted to add something to spice it up.
If only I had silver metal studs, I think they would have been perfect!
Lastly,
I thought I'd just pose with my favorite "cuticle cream", Jack Black's
Industrial Strength Hand Healer. It's the exact same color. Hehe!
I came up with this design a while back, but saved the whole manicure for Valentine's because I thought that it would be perfect for the occasion. Those glitter hearts are something! They're just the right pearly pink that's so dainty and romantic.
For my base coat, I used Dazzle Dry. Then, I put on 3 coats of Dazzle Dry Touch of Love, which is the perfect shade of pink that complements the hearts, and the name of the polish is just spot on!
Alternatively, you can use Orly Confetti. They should look similar, except that Confetti is more sheer and might need more coats. Both polish will give you that jelly or crelly (somewhere in between a creme and jelly, you know, not a flat solid creme) effect.
After the base color, I did 1 coat of The Face Shop WH003 glitter hearts polish, which only ended up being the small holographic glitter. Hehe! It took some effort to pick up the hearts one by one and place them on the nail, but it's well-worth the extra work. Still so much easier than having to do some real nail art! After the hearts, I covered everything with the Dazzle Dry top coat.
This is just all about layering. I think this could've looked better if the hearts were more randomly placed though. :) But I was happy with how it came out in the end.
And that's it! I leave you with these two music videos from the Plain White T's!! Enjoy and spread the LOVE! <3
It's been a while since I posted my last entry. I've been busy... But I'm so surprised and amazed how the blog is still alive and getting new visitors! Thank YOU!! There's no better motivation than having more readers to share my passion with. :) It helps to just have something published out here so people can search for it and check it out, even if it's not regularly updated. I need to do a better job at that.
I got an iPhone5 for Christmas and since then, I've been building up my Instagram content. But like my blog, I'm guilty to say that it, too, has a lot a backlog. I guess it's never too late to start to catch up! Little by little, I aim to get up-to-date. I downloaded this Blogger app and I hope that it can help me do a better job at keeping up with my nail posts. This is my first entry using this app, so I hope it comes out well. :)
On to my NOTD! This is The Impossible by OPI from the Mariah Carey collection. It's the first collection that came out with OPI's Liquid Sand formula. It has a very interesting texture. Can you tell from the photo? It has tons of glitter in it including stars(!!!), which is primarily the reason why I had to have it! It dries matte and you're not supposed to put topcoat on it, to keep the texture as intended. You can search for other swatches online if you're curious to see what it would look like with a topcoat on. But I like it as it is, and it's actually convenient that I can skip a step. :) It dries pretty fast too! This is two coats.
The picture above is the most color accurate. But in different lighting, you'll notice that it can look kind of wet and you can see how the mix of glitter works its magic!
Even if I had to fish out those stars for all of eternity, it's a solid buy! I bought this from Czarina, over at the The Nail Shoppe. This is the only one that I really liked after seeing multiple swatches of the whole Mariah Carey collection. But I'm sooo excited for the Disney Oz collection which features the OPI Liquid Sand - What Wizardry is This? And also for the Zoya Pixie Dust collection, which I'm tempted to buy a whole set of. Hehe! If ever, it'll be my first time to purchase an entire collection of polish! Anyway, I think this could be all the rage in 2013. Can't wait to get my hands on more of them!!
Have you tried anything from OPI Liquid Sand or Zoya Pixie Dust? How do you like it? I'd love to know! :)


