Saturday, September 29, 2012

Cupcake Nails

My best nail art to date. Cupcake nails!!!


I learned how to do this by following cutepolish's "Cute Cupcake Nail Art" tutorial in youtube. Try it yourself! With the right tools, it's not so hard to do!


As you can see, I did some tweaks and made it my own!! :D You can play around with different color combinations too! There are a lot of cupcake nail art inspirations in Google. Some people even make chocolate cupcakes using brown instead of white! Yum!! And you can definitely make the candy sprinkles more interesting with actual beads or hex glitter, you name it!


I like my nails sparkly, so I used a white silver glitter base color. I played around with Caronia's Crystal Frosted and was happy with it.

Next, I was able to easily create the vertical stripes for the cupcake base, thanks to these new found gems! I got these Sassy Nail Art bottles from Watson's for Php 30+ (USD $0.70) each! You can apply the polish using the tip at the top, which more or less works like liquid paper. Or, you can twist and remove the top to use the thin striper brush inside. I used the latter for my stripes.


After, I used a large dotting tool to apply the fluffy cupcake in OPI My Boyfriend Scales Walls, my go-to white polish. I think this was the hardest step to do. But I realized that it doesn't have to be perfect. Cupcakes aren't baked all equal. Some may be fluffier than others or some may even be lopsided. It doesn't matter if they aren't even, as long as they come out still looking like cupcakes! :D At this point, the design might look bulky, but don't you worry. Keep on working on the next steps, and the top coat will even it all out.

I applied the hearts on top using Essie Coral Reef. I just followed how cutepolish did it. Thebeautydepartment.com showed how to do this trick too. It was a bit tricky, but I managed. All it takes is a little bit of practice and you can try doing it on a piece of paper first.

To decorate the cupcake with candy sprinkles, I used Sassy in pink (same as the stripes) and China Glaze For Audrey. I just made the dots randomly in no particular order.

To top it all off, I put on one coat of Seche Vite dry fast top coat. It flattened the design and made it look professionally done!

I think that the colors I used blended well together and made the design pop out more. I'm very pleased with this. It's my favorite nail art and I actually drew something out of it. :) True enough, it was very popular with family and friends. :D

I did it to all 10 fingers! Aren't they soooo cute?!?! Nom nom nom!


 I wanted to take more pictures so I posed with my matching pink and purple loofas. Heehee :*)


And then, I found the perfect accessory to my nails!! A GIANT CUPCAKE!!! In complimentary colors too! :D


Fun fun fun!! I hope you can try this yourself! You won't regret it!! :)


Thanks for reading!
 

Friday, September 28, 2012

Ruby Red Glitter Nails for My Birthday

I have grown accustomed to wearing red on the day of my birthday. Red is such a happy color and it makes my birthday feel all the more special and exciting! Also, for the Chinese, it symbolizes good luck and fortune.

Erica, my friend and classmate from kindergarten all the way to college, and I, would dress up in red on each other's birthdays which are just 2 days apart! I was born on the 7th of September, and she followed on the 9th. So when we were in college and we didn't have to wear uniforms anymore, we wore red on our birthdays! In retrospect, we were probably like flashing signs of "greet us, it's our birthdays" and people got confused over whose birthday came first! Haha!

At first, I thought about doing cupcake nails. They're so popular and everybody seems to be doing it for their birthdays. But after some reflection and after listening to my inner calling, I decided. On birthdays, we wear red! I saved the cupcake nails for our birthday party to happen the following week.

And so, I ended up with amped up super shiny and shimmery ruby red glitter nails! 


This is not your ordinary red glitter polish! This is actually made of real loose glitter, the one you can get from your local supplies store.


I started off with Orly Star Spangled, a very nice glitter red polish, as my base color. It's one of the first few bottles that I bought from Polished Inthecity. :)

I then layered a coat of clear polish, before sprinkling on the red glitter powder. I suggest you use something that you're not afraid of ruining. The red glitter could easily transfer to the polish. Here, I used Face Shop's top coat because I was ready to dispose of it. Good thing I still found a use for it!

I did 2 rounds of clear polish and then glitter sprinkles to make sure that the whole nail is covered. When cleaning up, you can use some sticky tape to remove the excess glitter on your fingers and around your nails.

Orly Star Spangled, Leeho Red Glitter Powder, Sally Hansen Insta-Dri Anti-Chip Top Coat

 You can really see how nice and sparkly the glitter is from the close up shot below.


Sally Hansen Insta-Dri Anti-chip Top Coat was the perfect top coat to even everything out. I know that I have commonly used Seche Vite in my past entries. However, for this purpose, Sally Hansen was thicker and had a glossier sheen which made it the best finish to go with this design.


I found this tutorial on youtube with instructions on how to do it yourself. I didn't exactly do it this way, but it's more or less similar if you want to try it out!


What's your birthday nail art of choice? :)


* UPDATE: I forgot to mention that this manicure dried rock solid. After a few days, I filed my nails short and it didn't chip, not even one bit! I ended up keeping it for a full week. I bet you can keep it for longer, which makes this a good manicure for traveling and for low maintenance and upkeep. Just a warning though, taking this off was a nightmare. Hehe! So, enjoy it for as long as you can! :)

Tuesday, September 25, 2012

My Birthday Month, so far

Hello! Hello! Hello!

Once again, I am catching up with posts. :D It's the last week of September, and to be honest I'm still overwhelmed with all the activities taking place. It almost feels like the Christmas holiday rush is here; and yet, the celebrations have just begun!

Let me list down the highlights for you.
  • September 1 marks the start of the "ber" months. Here in the Philippines, that means we start playing Christmas songs in the malls. Our beloved shih tzu, Keno, celebrates his 10th birthday on the 1st. He's now 70 in dog years. 
  • On September 4, we watched The Phantom of the Opera at the CCP (Cultural Center of the Philippines). 
  • On the eve of the 7th, September 6, I played badminton with friends and waited up for the 7th over midnight snack at the Peacock Throne Persian Cuisine & Kebab at Mandaluyong. I was craving for their melon shake that tasted like Jonas' in Boracay. But alas, they were out of stock. :,(
  • On September 7, I celebrated my 28th birthday with my family at Paseo Uno buffet at the Mandarin Oriental Hotel in Makati. (More on this below.)
  • On September 11, my husband and I celebrated our 1st year wedding anniversary. We were supposed to stay at a hotel overnight, but then, we found out that he was sick with asthma, so we decided to stay home. Nevertheless, it was an emotional ride for me. We decided it's time to start a family. <3 :,)
  • On September 14, my friends and I went to the soft opening of Greeka Kouzina. It's a Greek restaurant owned by friend Kacy and her cousin Allan. It's located along P. Guevarra Street where the old Power Mac center used to be. You can't miss it! The food is to crave for!! Jor-el wrote an entry for this and you can read more here.
  • On September 15, my kinderpwend (classmate and friend since Kindergarten), Erica, and I, had our joint birthday party. She celebrated her birthday on the 9th and we've been celebrating our birthdays together with our friends for years. We had a sit down dinner in our house care of the boys (my husband and her fiance) and afterwards, the girls all played with nail polish! Haha! It was a fun night!
  • September 17. Jor-el's birthday gift, my new 15-inch retina display Macbook Pro arrived. Woohoo! This is the first blog entry that I'm composing on my Pro! Oh yeah!
  • On September 18, my mom hit a huge milestone and turned 50! Jor-el and I went home to my parents' house to surprise her on her birthday eve. On the day itself, we went back to our recent favorite, Paseo Uno for another round of buffet!
  • On September 21, I hosted our company team building at our house. One of my teammates organized the mooncake dice game for us. 
  • Upcoming on the 29th, my colleague's daughter is turning 1. I will be attending the birthday party in the afternoon. For dinner, I'll be going to a wedding reception for another colleague, who is getting married on the same day! 
So, how many highlights were there?? 11!!! I wonder if that even beats my calendar for December! That's probably the most celebrations I've had in a month!! And each highlight probably warrants a blog post! I could still be missing some other events or they're bound to crop up sooner or later. So many dates to remember, but i'll stop boring you with my calendar.

On to my birthday celebration, and some pictures to share.

Starting from the leftmost, clockwise: Jor-el, me, Shobe, Mommy, and Papa. Shoti joined us a bit later via Skype! :)

My mom is a new member of the Mandarin Oriental Hotel in Makati and we thought of using some of the coupons. It was seafood night at the Paseo Uno buffet. Jor-el and I were late, and upon our arrival, my dad immediately gave us a tour of the buffet and took us first to the prime rib carving station. Here's my first course for the meal.


Lo and behold, they also served foie gras!!! Yum! It's duck liver, though, not goose. But I still enjoyed it topped with the balsamic dressing! It gave an extra kick to my steak!


Since I started off with the main course, I worked my way back to the appetizers. Haha!


Then, on to some seafood! There was sea bass too! But I ended up skipping it.


There were more lobsters on the plate before I took the picture, but our appetite got the better of us. :*)


And as they say, there's always room for dessert!!


The staff and my family were sweet enough to sing a very nice resounding Happy Birthday song to go with the cakes. :)


Here's the present from my sister. (Isn't she thoughtful?) Plus some other shots my family took while waiting for my arrival.

My sister with that dreamy look on her face. So charming :)
Mother and daughter. So pretty!
My beautiful mom. Heck! She could be my sister! :)
Always happy for dessert!

How is your September so far? :)

Friday, September 7, 2012

Happy Birthday!!!

When people greet me a happy birthday, I can't help but say "Happy birthday!" back! It's just too happy a greeting to keep to yourself! There's just so much more love and joy in spreading it around!

So to all of you, I say, HAPPY BIRTHDAY!!! :)


With a birthday card to boot! :) I made this some years ago, inspired by my faaaaavorite stamp-making company, Hero Arts! Get more birthday card inspirations here. You can see where I got mine from. ;)

I bought the clear stamp set locally from Auntie Helen, over at Memory Lane Store! Check out her website! Or better yet, visit her store! You'll drown in a sea of scrapbooking materials and other arts and crafts supplies!!! Fun! Fun! Fun!


Enjoy and keep spreading the love! <3


** UPDATE: Wanted to add a few of the most touching messages I received today. <3

Thursday, September 6, 2012

Tonic Pink Jenica Plastic Peep Toe Wedges

Hello everyone! I can't resist but to squeeze in a short post here.

These are my new pink wedges from Tonic and I just love them to juicy jelly bits and pieces!!! (Drool...)


They caught my eye when I first saw them online. And they did not disappoint! When I wore them, oh wow! I felt like Barbie! Haha!

Kim brought these for me last week when we played badminton. I just had to try them on the moment I got home! You'll see me below still in my post-badminton outfit. Heehee


And of course, I had to wear them that same weekend. We were going to the new mall, Robinson's Magnolia, to watch "Katy Perry The Movie: Part of Me" and I thought they'd be perfect! But alas, we were mistaken and the cinema didn't show it in the evening. :,(  I ended up watching "The Campaign" with Kacy (thanks for being a true friend haha!), while all the others switched to "The Possession". (For the life of me, I can never ever EVER watch a horror movie.) To end our evening, there's nothing like a good old classic Banana Split from the Magnolia Creamery! :)

My outfit for the day: Mango dipped hem cold shoulder top, Mango tie dye skinny jeans, Tonic Pink Jenica plastic peep toe wedges, Agnes B. black tote bag, Forever 21 layered necklace, Thomas Sabo charm bracelet, and Swatch date ring.


Great elevation! My shoes kept my feet dry when it rained that night. :) Perfect for those unexpected rain showers! And needless to say, they were comfy to shop around in!

Here is the product shot.
You can order these beauties online from Tonic Bags and Shoes! These are also available in The Ramp Glorietta, The Ramp Trinoma, Wisdom Rockwell, PopCulture Alabang Town Center, and The Maze Ayala Cebu.

If you feel like pink is too loud for you, these come in bone white too! Check out the Jenica album and see for yourself!

Before we end this post, I have a surprise for you! What's a post without any nail art? Haha!

Here's a preview to Kim's aztec nails challenge! Don't they look so good with the shoes?? :)


Details to follow in the next post! Hope you enjoyed this one for a change. :)

Thanks for reading!

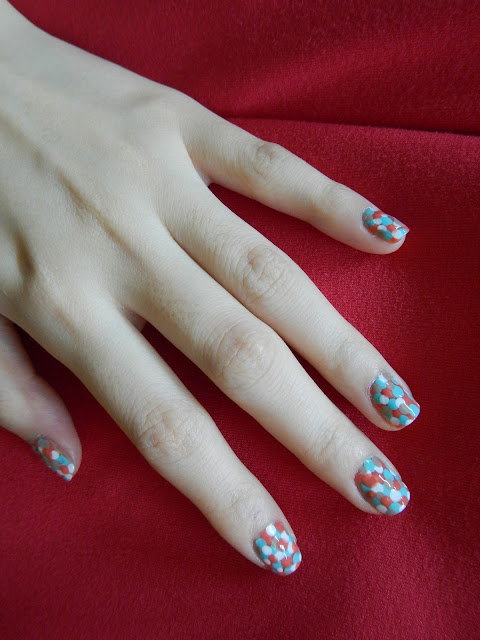
Dotted Nails--Dippin' Dotted, that is!

My friend surprised me over last week's long weekend with a pack of goodies--dotting tools!

I immediately searched for a design that would give these tools justice. I looked for pegs and stumbled upon Chalkboard Nails' nail art dotting contest. There were so many pretty entries, I had a hard time choosing! I don't know who actually won the contest, but my personal pick is monkeybuttsmomma's Dippin' Dots nail art!

The inspiration is the revolutionary ice cream brand Dippin' Dots--"the unique, futuristic and fun way to eat ice cream!" I fell in love with this design right away! Banana Split is also my favorite flavor! Sadly, I don't have any yellows in my stash and couldn't replicate this color combo. And what's a banana split without the banana???

So here's my take on it.

This looks like a yummy jelly!

Close up shot


I settled with 4 colors that looked good together. I don't think they resemble any of the Dippin' Dots flavors though. From left to right, I used OPI My Boyfriend Scales Walls, Orly Country Club Khaki, China Glaze For Audrey, and L'Oreal Steel Colour Hard Core Creme.


Here are earlier variations that i tried.


I can't wait to try this again with a new combo. It's so easy, you can do it yourself!! Trust me!

Here are the simple steps:
1. Put on a base coat. I used Orly Bonder.
2. Choose 2 or more colors of polish. If you don't have a dotting tool, just get a hair/bobby pin and dot away! Make random dots all over the nail, interchanging the different colors of polish. They don't have to be evenly spaced. The more sporadic, the better!
3. Finish with a top coat. I used Seche Vite dry fast top coat.

Easy peasy? Easy peasy!

Be prepared to be a head turner! :) This design catches a looot of attention. I wore this to the office with my red blazer and people greeted my nails right away! Haha! Such nice compliments too! My husband thinks that my nails look like they have sticker on them though. I can't tell if that's a good thing or a bad thing. :)


Now, I said that it's easy to do, but I didn't say it was fast! (You've been warned.) The challenge about not having a base color is that you have to fill the whole nail with just dots. And I found it nicer to layer different colors randomly versus doing all the dots 1 color at a time (which is kind of how I did it). But it's really fun to do! Don't be discouraged if you don't like how it looks after a few dots or a few nails! You have to see it in its entirety.


Don't they just look fun and playful? :)

Before I removed my polish, I played around with some finishes to see if they would improve the overall design. The Orly Matte Top coat stood out and I realized that the matte finish really looks good with this manicure!! It almost looks like the real Dippin' Dots ice cream in its frozen state. Nom nom nom. :)


Now, if only I could take a shot with a cup of Dippin' Dots!! Crave. I think I'll go have some this weekend. :)

I'm taking a break from all the dots after this manicure. I'm excited to show you what's next!!

See you then!