A First Successful Attempt at Nail Art
Disclaimer: This is one of my longer entries. Please indulge me in taking you through my journey, my new found love, for nail art.
My Inner Struggle: Nail Art Fears
My sister-in-law sent me a link to a video one day on how to do this new nail art design called braided nails. The video was a tutorial done by cutepolish. You can watch it here.
It got me excited to see a new design, but at the same time disheartened because I knew I would never be able to pull it off.
You have to understand that I've never done any nail art before. Maybe I have "tried" by just using my normal polish brush and putting on dots or stripes on my nails, but they were all messy and never came up nice. All my attempts had failed, so I just stopped trying.
I also had this notion that I would never get into nail art because I just didn't have time nor the patience to sit down and wait for my nails to dry before I do the next step. I usually just put on nail polish as it comes in the bottle. Plain and simple. When I get bored with it after a few days, I would layer it with some effects like glitters or a matte top coat to update the look. When i have a good color combo or effect that I wanted to play with, I would do some accent nails on my ring finger and my thumb. Other times, when I'm totally indecisive and I couldn't pick a color to use (it has happened a few times), I just put on all 5 colors. One color for every finger. The style for putting different colors together on one hand is called "Skittle Nails". If you're brave enough, it's really fun to try and wear around! But I digress.
What I’m trying to say is that I've never succeeded in doing nail art and I didn't have a strong inclination to actually try it out again until this video came along. At first, I was skeptic. I was only tempted because cutepolish made it seem so easy to do! What's more is that you don't need any tools (which I don't have) to do this design! There was nothing that prevented me from trying it out. I had hope.
Taking the Plunge: Attempting Nail Art
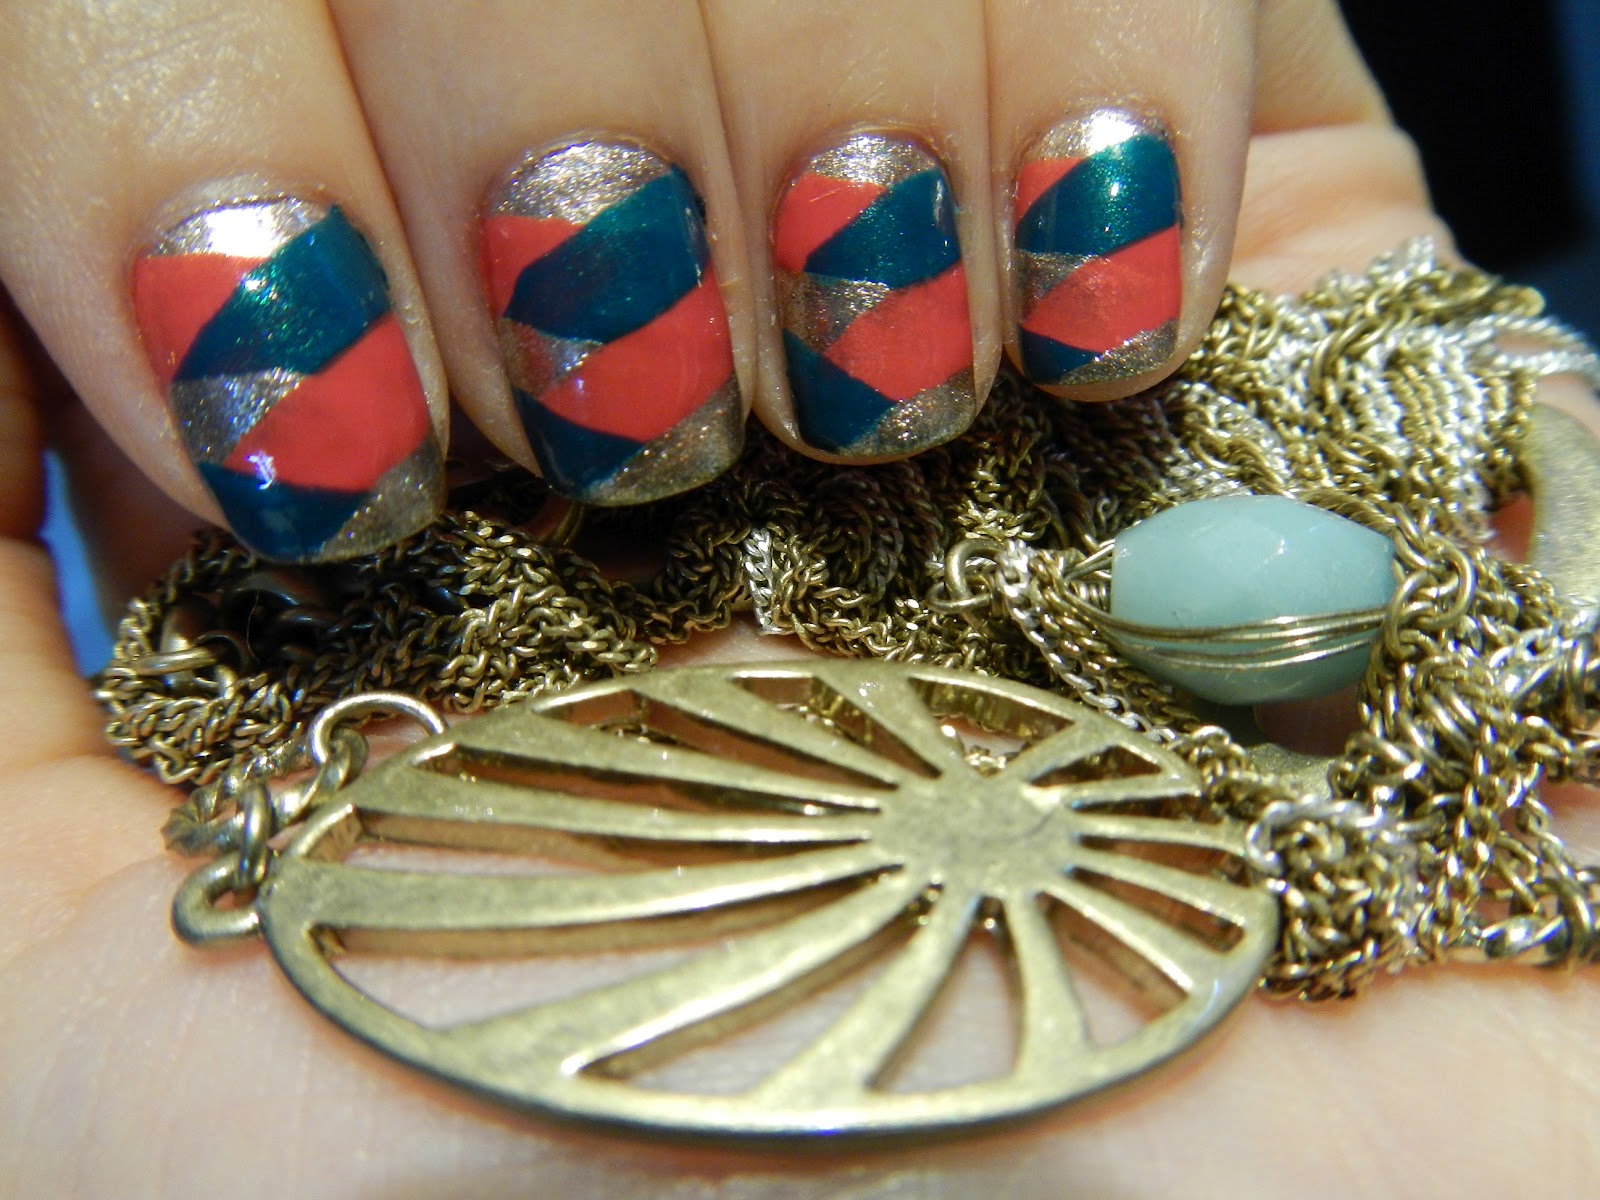
So I checked my collection in search for the 3 colors that looked closest to the ones cutepolish used on her video. I ended up with Orly Rage for my metallic, Essie Coral Reef for my neon (it’s not a neon, but I think it’s bright enough to pass), and Sally Hansen Hard As Nails in Funky Frost for my pearlescent color. You can mix and match any 3 colors you like, but luckily I had 3 similar colors and didn't have to be creative to come up with my own.

Aren't they gorgeous? Not a bad first attempt, if i could say so myself!


The process turned out as easy as how it appeared on the video. I had to go back and look at the video from time to time though, just to check if I was doing the color order correctly. When I got the hang of it, it was just really like braiding your hair except you're braiding your polish (hence the name of the design, braided nails! Duh! Slap on the head.) The hardest thing about it, I guess, is having to keep a steady hand. But that's more or less a requirement for putting on nail polish yourself right? So if you can do your own nails, then you should be able to do this too! If you can dream it, you can do it! Lol! Just a little "Blades of Glory" humor there. :)
I also really like the fact that there is no waiting time needed. Well, maybe there is, but i just didn't bother and it worked out for me. And thank goodness for Seche Vite, which works best by directly applying it onto wet polish. Right after I did my last stroke/braid, all I had to do was to put on the wonder top coat and wait for the magic to afix itself on my nails! :)
 |
| In direct sunlight |
 |
| With flash |
Tips and Tricks
- Keep your nails long for this design. It will allow you to produce more braids. But as cutepolish said in her tutorial, “Three stripes from each side of the nail looks best. Too little or too many can ruin the effect.” If you're curious to see what this design looks like with shorter nails, check out the pictures below and compare for yourself. I ended up filing my nails short after a few days because I just couldn't stand long nails. Hehe!


- As much as possible, use polish that is opaque in 1 if not 2 coats. Better use something that dries relatively quick too to avoid smudging.
- Avoid using polish with the pro-wide brush (e.g. OPI or some Sally Hansen polishes), they are harder to maneuver for this design and are too thick with the strokes. But if you have longer nails, then I guess you have more space to work with and could use thicker strokes.
- Use thin coats. Too thick will take longer to dry and will make your nail look clumpy. And it's more prone to smudging.
- When doing the braided strokes, keep your polish brush steady and instead, roll your finger or nail from left to right or vice versa. This will help produce even results.
- Don't worry if it looks messy at first. You can clean it up afterwards.
- Wrap your tips properly. Else you will end up with multi-colored ones.
- Do each step to all of your nails to give it more drying time in between coats. I tried doing this design on my ring finger and my middle finger first because I thought it would be too hard to do all but it didn't look right and came out much better when I did all my nails. Perhaps it's the color combination that I used.


Lastly, have fun and don’t give up!
My Thanks
All my thanks to my sisters-in-law, Raissa and Mac, who found this video. And most especially to cutepolish for opening my eyes to the wonderful world of nail art! Nail art is now a new undertaking yet to be explored! The possibilities are endless! I have renewed enthusiasm to try new designs, and to try out the tips and tricks and DIY's I've only read about. It is no longer a fantasy, it's a reality!
Thanks also to one of my favorite online bloggers, Marta, of chitchat nails for continuing to inspire me and for keeping me up at night. Haha ;) The picture below is a tribute to her. Her pictures are always divine! Go check out her website. You'll know what I'm talking about. I got this idea of posing with accessories from her. It's a fun way to personalize your photos. I think she's a great role model and I can only aspire to make nail art and take pictures as well as her. :)

Have you tried this design? What other color trios do you think would work with it? For those who have tried this, I'd love to see what you came up with! Feel free to leave a message in the comments section.
Watch out for more attempts at nail art next time! Thanks for reading!
I don't know if I have ever gotten such a sweet shout out! ;)
ReplyDeleteI really like how this braided look turned out for you! I haven't tried it yet but I think I might have to now ;)
Keep up the excellent work! :D
Hi Marta!! Welcome to my blog! Thanks for dropping by! Not only are you really talented, but you're really nice too! :) Appreciate the support!
DeleteI posted this exact same tutorial on my blog! But your nails turned out way better haha!
ReplyDeleteCool! I'll check it out! I have absolutely no patience with writing my own tutorial, so you'll notice that I usually just reference other people's or talk through what I did. Haha!
DeleteI'm sure you did well! I love your work! But thanks so much for the compliment!! This design is what got me into nail art in the first place! :D
Instagram Takipçi Satın Al
ReplyDeleteToptan Telefon Kılıfı
Resimli Magnet
Silivri Çatı Ustası
Çerkezköy Çatı Ustası
4QU